Smooth Your Fonts
Using the “smoothing” (anti-aliasing) feature on your computer is one of the easiest ways to make text look better on your machine. It’s easier than you might think. Read below for instructions for your Windows or Macintosh machine.
For Windows:
Apply smoothing to your onscreen type in Win98, Win2000 and WinMe.
- Go to START > SETTINGS > CONTROL PANEL > DISPLAY (or right-click your desktop).
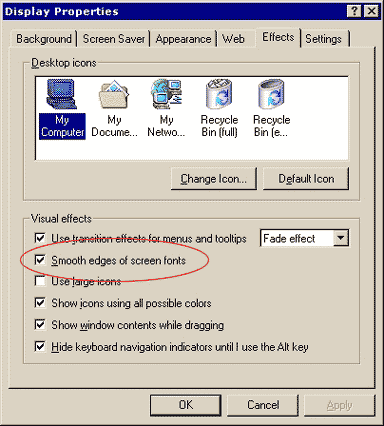
- Click the EFFECTS tab.
- Check “Smooth edges of screen fonts.” (see image below)
- Click “OK” to close window and apply settings.
- Enjoy!

For Macintosh:
Apply smoothing to your onscreen type in MacOS 8.x - 9.x.
- Go to APPLE MENU > CONTROL PANELS > APPEARANCE (or control-click your desktop and choose CHANGE DESKTOP BACKGROUND).
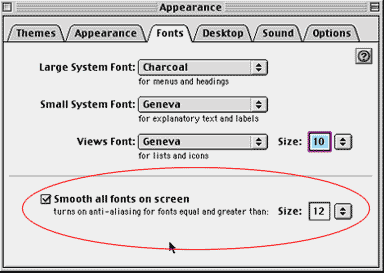
- Click the FONTS tab.
- Check “Smooth all fonts on screen.” (see image below)
- Choose a point size for the smallest type to apply smoothing to (12 pt. is the smallest allowed).
- Close the window to apply settings.
- Enjoy!

Apply smoothing to your onscreen type in MacOS 10.x
- Open your SYSTEM PREFERENCES.
- Go to the PERSONAL Area and choose APPEARANCE.
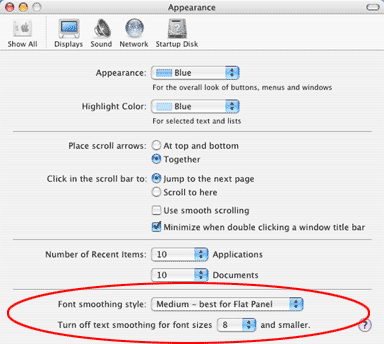
- In the “Font smoothing style” area, choose from the drop down list the setting that best matches your environment.
- Choose a point size for the smallest type to apply smoothing to (8 pt. is a good size to select).
- Close the window to apply settings.
- Enjoy!
